
RF Wattmeter based on PIC16F876 and AD8307
The Project was crated by oz2cpu but his site is down for some reason
I decided to revive it once again

The project can be devided into two main
components :A) the RF to DC converter B) the logic board .
The RF power
conversion is accomplished using the famous AD8307 this little IC
measure RF power input and output a DC voltage that is linear to the
power input level , the maximum input is 1W for this circuit and
attenuator is needed for higher power inputs , the output voltage
from the AD8307 board varies between 0-2.5V DC and the Logic board
taking care of the rest .
 When soldering the component pay attention to the IC orientations some resistors are stacked one above another the three 1206 100 ohm makes 33 ohm input that handle up to 1W RF power , also stacked are the 33 and the 39 ohm resistors . The Inductor is just 22awg wire twisted 3 times on 3mm former.
Be careful when connecting the output to the logic board. Even brief touch of +5V power, will fry it for good !!
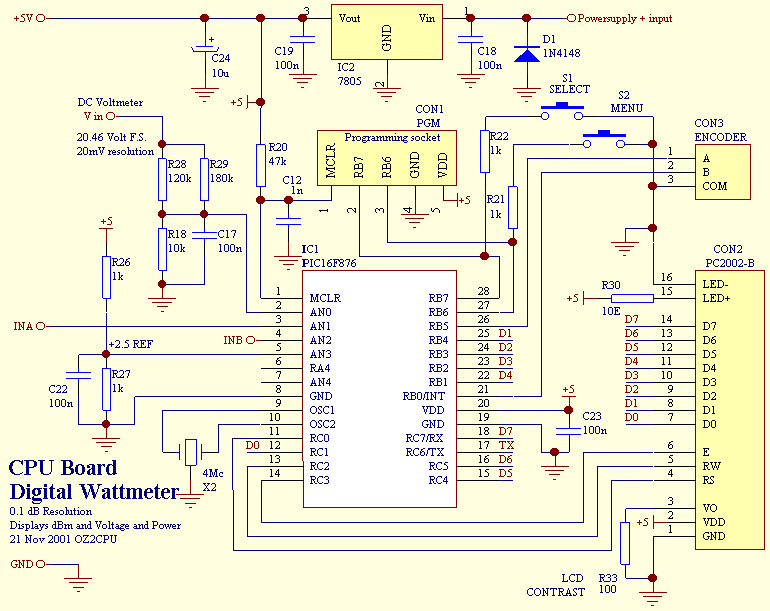
The RF Logic board does few things :
A) The output from the AD8307 Board is fed into the A/D input of the PIC micro. A resistor network take the 5V voltage divide it by 2 and the 2.5V reference is fed into the PIC Voltage reference input . This assure full dynamic range for the AD8307 output .
B) All conversion, and calculation text and graphics are stored in the PIC EEPROM. So for any given analog value, there is a location in memory that store the RF level in Decibel , the Status , the RF Voltage , The bar graph animation , and power in Watts .
 There are no hard arithmetic calculations to be made, since it been already per-calculated and stored in the Non Volatile Memory .The PIC will push the data to the LCD very quickly .
C) The Voltmeter functions is done again with another analog input , and since we used 2.5V as reference Voltage we increase the range to +20V by using another voltage divider , the pic will automatically compensate for any errors resulting from component tolerance , using the software .
D) Button inputs are checked periodically for the Encoder input and the push buttons and menu is presented when button is pressed .
The next thing to do is to program the logic board: Programming
The next thing to do is to program the logic board: Programming
Please visit store page to get the bare PCBs for special price